Having an old, uneven, and unattractive garage floor can be quite irksome, especially if you are unsure of what to do about it. Many people think that because concrete is so tough and durable that it cannot be sanded or ground. Fortunately, it is possible and isn’t all that difficult to do, and with the right tools and guidance, we can help you give your garage floor a beautifully smooth finish, perfectly ready for an epoxy coating, or a lick of paint. This post aims to work as a guide to help you understand the things you’ll need as well as step-by-step on how to sand your garage floor. Let’s get into it.
Getting Started: Safety First
When sanding an extremely tough surface like concrete, you should expect to see a lot of dust. However, this is no ordinary dust. When sanding these surfaces, high levels of crystalline silica is produced. Prolonged or repeated exposure to silica can lead to a very dangerous and sometimes fatal lung disease known as Silicosis. Furthermore, exposure to this material can also lead to lung cancer. While this sounds quite dangerous, it is easily avoided with the right equipment. Here are some extremely efficient ways to stay safe while sanding your garage floor:
- Wear appropriate concrete dust-approved safety gear – as mentioned above, the effects of increased exposure to the material found in concrete dust are dangerous and therefore you must ensure that you invest in approved safety gear. You will need a dust mask, safety glasses, earplugs, gloves and consider getting some overalls, though these are not necessarily required.
- Prepare your garage floor – while this should be obvious, ensure that you have tidied and removed everything that could be in the way while sanding. This will ensure that you do not trip on anything while also ensuring that any dust produced does not land on your belongings.
Required Tools
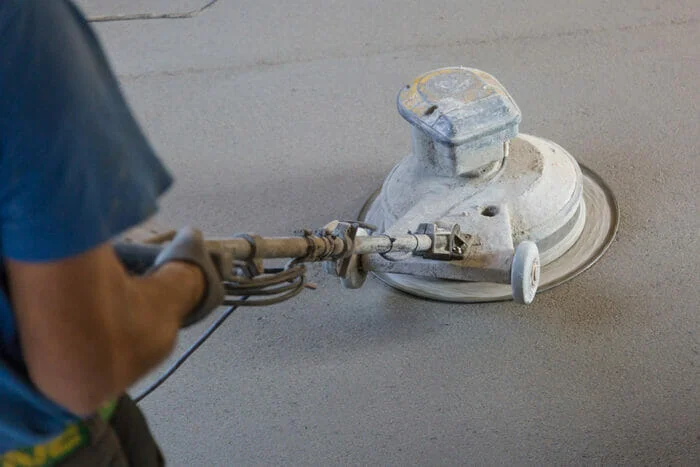
Ultimately, in order to sand your garage floor, you will need to work out what type of grinder or sander you will need and this will depend on the condition of your garage floor itself. It is important that you purchase the most suitable sander for the job as this will make the project go smoothly and the end result will be of a higher quality. For example, if your garage floor is in fairly good condition, you can get away with sanding it using just a hand sander. However, if your garage floor is very uneven, then a concrete floor grinder would be best. With that said, a grinder would be best as it will require the least amount of elbow grease while also providing the most uniform finish.
Here is a list of items you will require in order to sand your garage floor:
- Floor grinder
- Hand sander or pads
- Shop-vac
- Degreaser (depending on requirements)
- Hard Bristled Broom
- Pressure Washer (If you have any old paint on your slab it will get rid of it and also it will dramatically help with cleanup)
- Diamond sanding pads (depending on requirements)
- Patching slurry or Epoxy resin (ensure it is the same shade or color as your garage floor)
- Silica Sand (depending on requirements)
- Trowel
Step-by-Step: How to Sand your Garage Floor
Assuming you have followed the steps above, you are now ready to get to sanding. Here is a step-by-step guide on how to sand your garage floor.
1) Clean and Wipe your garage floor
Whether you are deciding to sand your garage floor by hand or using an orbital floor sander, it is important to thoroughly clean and wipe your garage floor, ensuring that there is no debris, rocks, or dirt that could leave pits or cause any issues during the job. This can be done with a mop, pressure washer, or even using a sponge, though this will likely depend upon how big your garage is. Once you have done this you may want to use a degreaser to get rid of any old oil or grease that may exist on your garage floor. Be sure to follow the instructions on the back of the product. Most degreasers will require you to leave it to sit for a few minutes before you can then scrub with your broom. Once you have scrubbed the floor, rinse thoroughly with your pressure washer, and leave to try before proceeding with the next step.
2) Fill any holes or cracks
Once your garage floor is dry, it is time to fill any holes or cracks with a decent patching slurry or epoxy resin. It is important to mention that most slurry products available on the market will require the surface to be misted or gently moistened (using water), before applying the slurry. This is because, without it, the concrete will draw in the water from the slurry, thereby changing its content ratio. If you go with epoxy resin, you will need to insert the sand into the hole or crack before you insert the epoxy resin. This is because otherwise, the resin will just flow down into the ground. Using your trowel, apply the patching slurry and aim to make it as even as possible, though this is not totally important as you will be sanding it down if it isn’t anyway. Once all holes and cracks have been filled, leave them to dry for at least 24 hours to let them cure before sanding them down.
3) It’s time to sand
Now that the floor has both been cleaned and prepared it is now ready for sanding. When sanding your garage floor, ensure that you apply even pressure throughout and do not leave the grinder stationary in one place for too long. After a while, you might notice that your shop-vac will stop being as effective as usual. This is because the silica and dust produced blocks the filter and the air going through it. To combat this, you will have to empty it now and then to ensure that you are picking up all the dust as you sand. Once you have finished sanding the floor, use a hand pad or hand sander to reach the side and other areas your grinder couldn’t reach. Once you are happy with the finish simply give it a quick clean and you have completed sanding your garage floor. If you are looking to paint it, then you will need to apply a good concrete sealer. This will help the paint bond to the concrete.